Easy Felt Flower Directions With Button Center
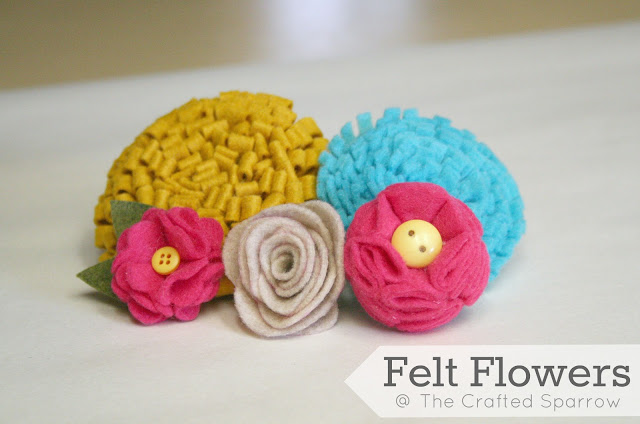
I have done a lot of projects projects using felt flowers like my Fall wreath HERE , Felt Flower Ring HERE , and my Valentines Day wreath HERE . I love felt, it is no secret! It is super inexpensive, comes in great colors {even if it's just from the local craft store and not the fancy stuff}, and there is so much you can make with it. I thought today I'd give you a refresher course in how to make the {5} different felt flowers featured above. They are all easy and simple.
Supplies:
– Felt, whatever colors you want to use
– Scissors
– Glue gun and/or thread
– Buttons or Rhinestones, optional
Flower #1 – Looped Mum Felt Flower

Start with a long strip of fabric. For these big ones I typically use felt by the yard, if your making smaller MuM style flowers like in my previous ring post you can use the 8.5 x 11″ felt sheets from the craft store. This particular flower is about 4″ in diameter and I used a 26-28″ long x 1.5″ wide piece of felt.

Using a glue gun, glue the edges together all the way across.

Once it's glue along the edges take your scissors and snip every 1/8″ – 1/4″ depending on how big you want your loops to be. You can have bigger loops if you want, I prefer them closer together. Snip the entire length of your felt.

It should look like this when your done.

Starting at the end place a small dab of glue from your glue gun and begin to roll your felt like this. And continue to glue as you go until you reach the end.

When your done it should look like this. You can place a rhinestone or button in the middle if you'd like, but they are pretty plain too!

Flower #2 – Straight Mum Flower

Exactly the same technique as the previous flower, except you don't glue the edges together to create the looped look. Start with a strip of felt, again this was using felt by the yard to create a larger flower. I cut the width on this particular one to be about 1″ wide. A little wider would also create a nice whispy looking flower.

Same thing as before snip it all the way across evenly. I like them closer together to create narrow strands.

Again using your glue gun to place a dab of glue at one end, begin rolling it like so until you get to the end. You will be left with a flower looking like the above picture.

Flower #3 – Rolled Rose

For this you will need the template from HERE . If you use the template at the size it comes in you will get roses about 2″ in diameter. You can enlarge your template bigger to create larger flowers. Start with your felt.

Your template should look like this when cut out.

Trace your template on to your felt. FYI – using a pink or dark marker isn't the best choice, white colored pencils on darker colors are ok or pencils maybe.

Cut out the template. And starting at the end you will place a dot of glue with the glue gun and begin rolling it all the way around gluing as you go. You should end with the large round circular piece that is the bottom of the flower. Sorry I forgot to take a pic of this process.

Flower #4 – Frosting Flower {couldn't think of a better name}

You will need to cut a bunch of circles out of your felt. I used a medicine measuring cup to trace for this particular flower since I wanted it small, but any round small cup or bowl is a great size for larger ones. For my small one I used 12 circles of felt. You will also need 1 slightly bigger circle as your base.


This is your base.

Start by taking your circles of felt and folding them in half and gluing a dot in the middle to hold it.

Place another dot of glue then fold it over like this. Then take the extra and fold it back the opposite direction. It should look like an "S" shape.


Like this.

Start gluing them to the base like fitting pie pieces back in to the pie. 6 pieces on the bottom.


Then another 6 on top of the first layer of 6. This will create a very full ball of frosting look. You can add a button or rhinestone with hot glue if you'd like. Fluff it up when it's dry and it will look like the top picture.

Flower #5 – Scalloped Flower

This is the exact same flower as the previous one except this one has scalloped edges. You'll need to create a pattern for yourself on card stock and cut it out for the scalloped edges. For this small flower I only used 4 scalloped circles, and 1 base circle.

Make the "S" shape petals again and glue on to the base. I placed a small button in the middle. Feel free to add leaves like I did to the top picture as well.

I hope all these tutorials helped you.

Source: https://www.thecraftedsparrow.com/2012/04/felt-flowers-tutorials-5-to-choose-from.html
0 Response to "Easy Felt Flower Directions With Button Center"
ارسال یک نظر